Web
and Book design,
Copyright, Kellscraft Studio 1999-2018 (Return to Web Text-ures) |
 (HOME)
|
A
LADY'S WRITING DESK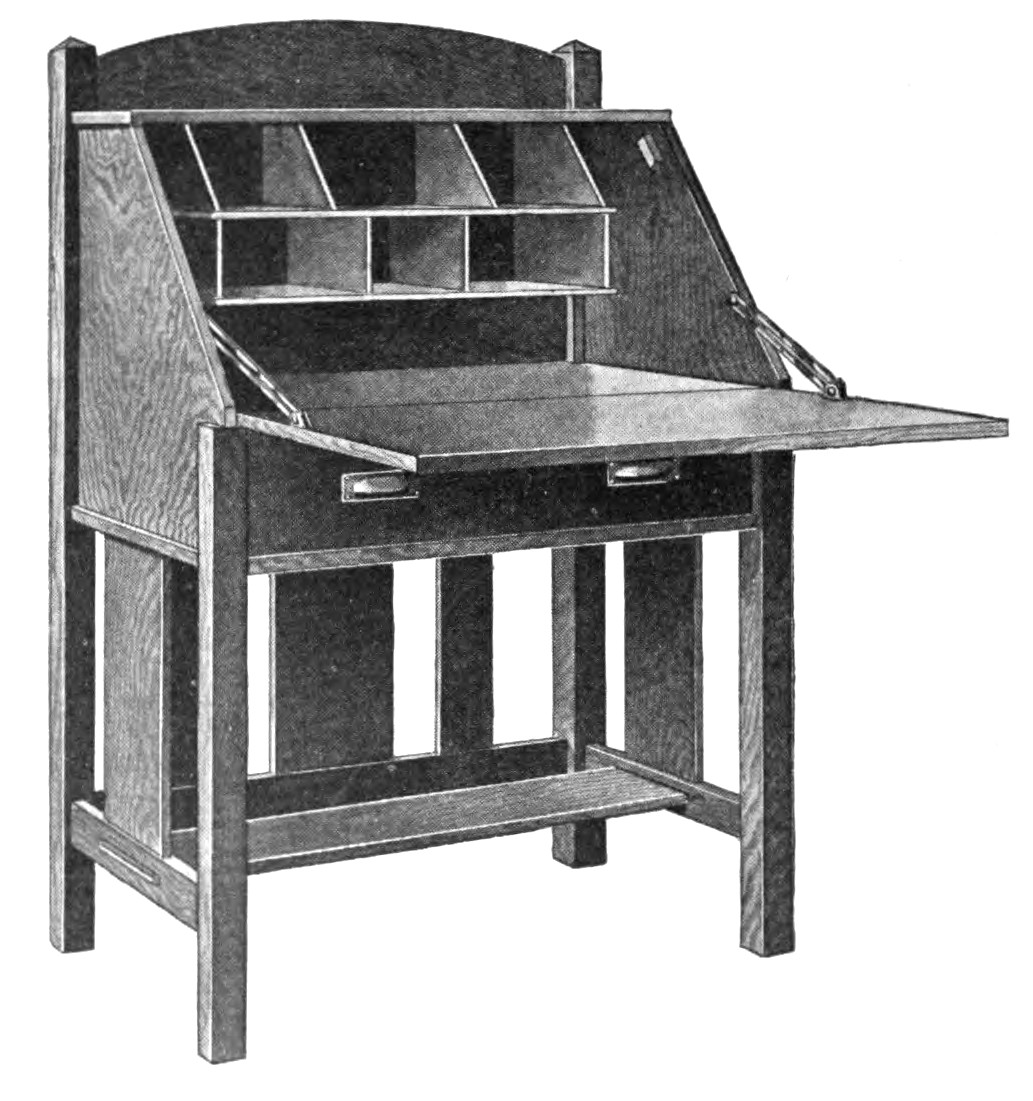 Desk Complete This desk of mission style is a little more complicated than some of the other pieces of mission furniture that have been described, but anyone who has a fair knowledge of tools will not have much trouble in constructing it in the home workshop if the plans are carefully followed. Quarter-sawed oak is the best wood to use, as it is easy to work and looks best when finished. Order the stock from the mill ready cut to length, squared and sanded. Following is a list of the stock needed: 2 front posts, 2 by 2 by
30 in.
2 back posts, 2 by 2 by 50 in. 1 bottom rail, 3/4 by 3 by 31 in. 2 end rails, 3/4 by 3 by 18 in. 1 stretcher, 3/4 by 8 by 331/2 in. 2 end slats, 3/8 by 8 by 15 in. 1 back slat, 3/8 by 8 by 15 1/2 in. 2 back slats, 3/8 by 3 by 15 1/2 in. 1 front drawer rail, 3/4 by 1 1/4 by 31 1/4 in. 2 side drawer rails, 3/4 by 3 by 18 1/4 in. 1 drawer front, 3/4 by 6 by 30 in. 1 desk lid, 3/4 by 18 by 31 1/4 in. 1 desk board, 3/4 by 19 1/4 by 31 1/4 in. 2 end boards, 3/4 by 19 by 21 1/4 in. 1 top board, 3/4 by 10 by 34 in. 1 top back board, 3/4 by 5 by 31 1/4 in. 1 back board, 3/4 by 30 by 22 in. 2 drawer sides, 1/2 by 6 by 19 1/2 in., S. W. 1 drawer end, 1/2 by 6 by 29 in. S. W. 1 drawer bottom, 1/2 by 18 by N in., S. W. 2 pieces for pigeon holes, 3/8 by 7 by 23 in., S. W. 8 pieces for pigeon holes, 3/8 by 4 by 6 3/4 in., S. W. Start with the back posts, being sure they are square and of the right length; place them side by side and lay out the mortises for the lower rails, the desk rails and the top back boards, as shown in the accompanying detail drawing. Lay out the front posts in the same manner. Cut the tenons on the ends of the rails to fit the mortises in the posts. Also cut mortises in the rails for the back and end slats. The end rails have a mortise in them for the tenons on the ends of the foot boards. Clamp the ends of the desk together, with the end rails in place; then fit the side boards. Bore holes through the posts into the side boards for dowels as shown. After the dowels are in place the holes can be plugged. Cut and fit the top back board, the bottom rail, the back board and the stretcher. Cut the top and desk boards at the back corners to clear the posts. The top board is to be fastened to the side boards with blind screws. The back board is -fastened to the posts with dowels as shown. When all the parts fit square and tight they can be glued together. The ends of the desk should be glued up first and left to dry, then the other parts put in place and glued. When clamping the parts together see that they fit perfectly square and tight. While the glue is drying the drawer can be made. The front board is made of oak, but the other parts may be made of some soft wood. The side pieces are mortised and glued to the front board. The end and bottom boards can be nailed together. 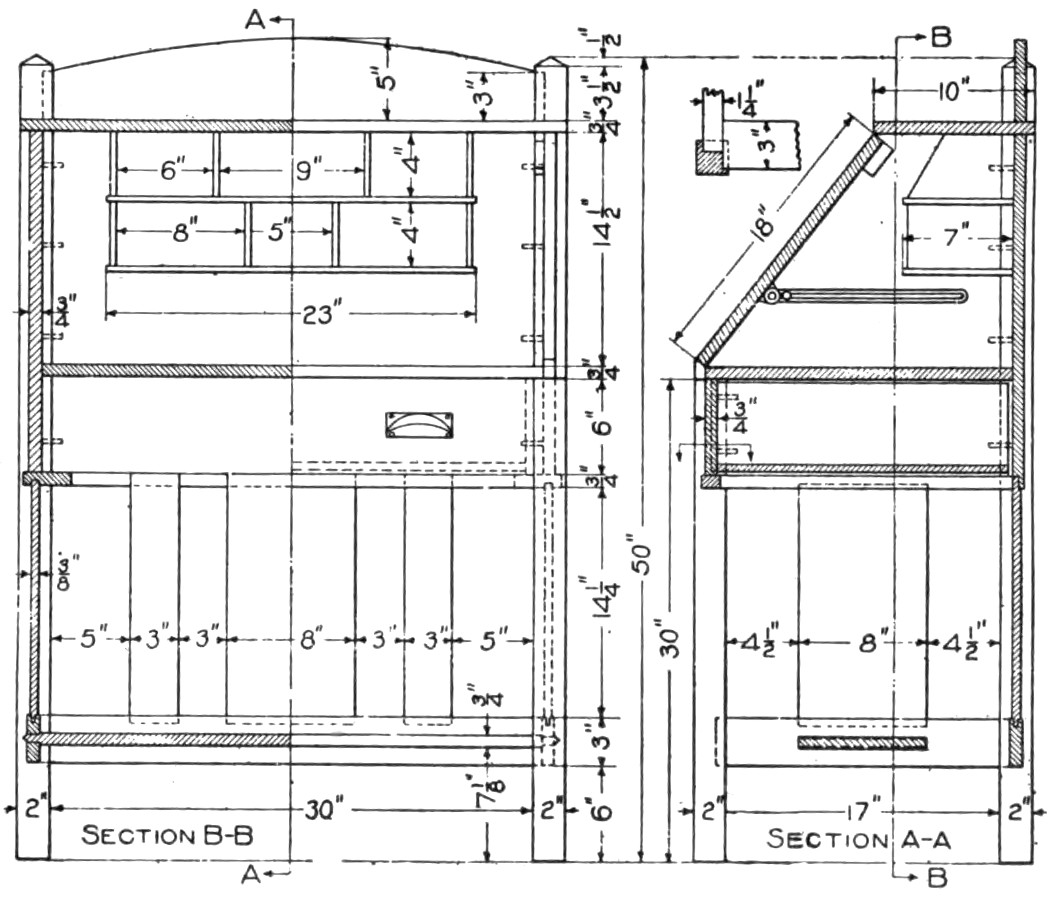 Details of Writing Desk (click for larger image) The drop lid of the desk is made as shown. Two or more boards may have to be glued together for the lid, the desk bottom and the back board. The lid is fastened to the desk board with two hinges, and it should be so arranged that when closed it will be even with the sides. Brackets or chains are fastened to the inside to hold it in the proper position when it is open. Small blocks of wood fastened to the inner edge of the side boards will prevent it from closing too far. A lock, if desired, can be purchased at a hardware store and fitted in place. Suitable handles for the drawer should also be provided. When the desk is complete go over it with fine sandpaper and remove all rough spots. Scrape all glue from about the joints, as the finish will not take where there is any glue. The pigeonholes are made from 3/8 in. stock. They may be tacked in place after the desk is finished. The finish can be any one of the many mission stains supplied by the trade for this purpose. If the desk is well made and finished, it will have a very neat and attractive appearance. |
 Click the book image to turn
to the next Chapter.
Click the book image to turn
to the next Chapter.